LLM小实验 – 构建专属 RAG知识库 与 AI 咨询机器人
在这篇博客中,我将分享如何利用你在 WordPress 上发布的分享内容,构建一个专属知识库,并结合本地离线大模型(通过 Ollama 部署)实现检索增强生成(Retrieval Augmented Generation,RAG),打造专属 AI 咨询机器人。下面是整个实验的配置步骤和实现过程。
实验背景
在这个小实验中,我们希望利用已有的 WordPress 内容作为知识库,通过以下流程实现:
- 数据采集:从 WordPress 获取文章内容(利用 REST API),并保存为 JSON 文件。
- 数据预处理与清洗:对获取的 JSON 数据进行 HTML 清洗、文本分段,并保留图片链接信息(可根据需求选择分离存储或插入占位符)。
- 文本嵌入与向量数据库构建:利用 SentenceTransformer 将每个文本段落转换为向量表示,并使用 FAISS 构建向量检索索引。
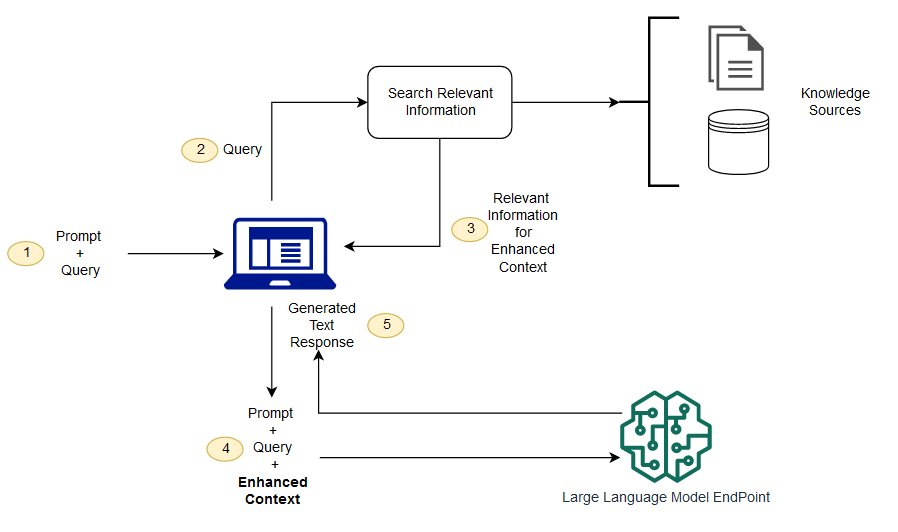
- 检索增强生成(RAG)与回答生成:当用户提出问题时,根据用户问题生成查询向量,通过 FAISS 索引检索最相关的文本段落,再构造一个包含上下文的 prompt,最终调用本地 Ollama 部署的大模型生成回答。
实验步骤详解
步骤 1:数据采集
目标:从 WordPress 中提取文章、页面等内容,并保存为 JSON 格式,作为后续知识库的原始数据。
- 关键操作:
- 确定需要采集的内容(例如:文章)。
- 使用 WordPress 内置的 REST API(如
https://yourdomain.com/wp-json/wp/v2/posts)获取数据。 - 编写脚本采集数据,并将数据保存为 JSON 文件。
import requests
import json

# 设置你的 WordPress 站点地址
wp_site = "https://yourdomain.com"
api_endpoint = f"{wp_site}/wp-json/wp/v2/posts"

# 请求数据(可以设置参数,如 per_page、page 等)
response = requests.get(api_endpoint, params={'per_page': 100})
if response.status_code == 200:
    posts = response.json()
    # 将数据保存到本地文件
    with open("wp_posts.json", "w", encoding="utf-8") as f:
        json.dump(posts, f, ensure_ascii=False, indent=2)
    print("数据采集成功,共采集到", len(posts), "篇文章")
else:
    print("数据采集失败,状态码:", response.status_code)

步骤 2:数据预处理与清洗
目标:对采集到的 JSON 数据进行清洗,包括去除 HTML 标签、分段处理,同时保留图片链接信息。
- 关键操作:
- 读取 JSON 文件中的内容。
- 使用 BeautifulSoup 去除 HTML 标签,同时保留图片链接(可以选择将
<img>标签替换为占位符)。 - 按照自然段或者空行对文本进行分段。
- 将处理后的数据(文章 ID、标题、各段落及图片链接)保存为新的 JSON 文件。
import json
from bs4 import BeautifulSoup

def extract_images(html_content):
    """
    提取 HTML 内容中的所有图片链接,返回一个列表
    """
    soup = BeautifulSoup(html_content, "html.parser")
    images = []
    for img in soup.find_all("img"):
        src = img.get("src")
        if src:
            images.append(src)
    return images

def clean_html_keep_images(html_content):
    """
    清洗 HTML 标签,但保留图片链接:
    - 替换 img 标签为占位符 [图片: 图片链接]
    - 同时返回一个图片链接列表
    """
    soup = BeautifulSoup(html_content, "html.parser")

    # 提取所有图片链接
    image_links = extract_images(html_content)

    # 用占位符替换 img 标签
    for img in soup.find_all("img"):
        src = img.get("src")
        placeholder = f"[图片: {src}]"
        img.replace_with(placeholder)

    # 获取清洗后的纯文本
    text = soup.get_text(separator="\n")
    return text, image_links

def split_into_paragraphs(text):
    """
    根据空行切分文本为多个段落
    """
    paragraphs = [p.strip() for p in text.split("\n\n") if p.strip()]
    return paragraphs

def process_wp_posts(json_file, output_file):
    """
    读取 WordPress API 导出的 JSON 数据,处理每篇文章的内容,
    清洗 HTML,分段,并保留图片链接信息,最终保存到 output_file 中。
    """
    with open(json_file, "r", encoding="utf-8") as f:
        posts = json.load(f)

    processed_posts = []
    for post in posts:
        # 提取原始 HTML 内容
        raw_html = post.get("content", {}).get("rendered", "")
        # 清洗 HTML 标签,同时保留图片信息
        clean_text, image_links = clean_html_keep_images(raw_html)
        # 将清洗后的文本按照空行切分成段落
        paragraphs = split_into_paragraphs(clean_text)

        processed_posts.append({
            "id": post.get("id"),
            "title": post.get("title", {}).get("rendered", ""),
            "paragraphs": paragraphs,
            "images": image_links  # 单独存储图片链接
        })

    with open(output_file, "w", encoding="utf-8") as f:
        json.dump(processed_posts, f, ensure_ascii=False, indent=2)
    print(f"处理完成,结果保存在 {output_file}")

if __name__ == "__main__":
    # 假设你已经有一个保存了 WordPress JSON 数据的文件 wp_posts.json
    process_wp_posts("wp_posts.json", "processed_posts_with_img.json")

步骤 3:文本嵌入与向量数据库构建
目标:将预处理好的文本(段落)转换为向量表示,并构建 FAISS 向量检索索引。
3.1 环境准备
确保已安装以下依赖:
pip install sentence-transformers faiss-cpu numpy
3.2 加载数据
- 读取预处理后的 JSON 文件,抽取所有文本段落,并构建映射信息(记录每个段落所属的文章信息)。
3.3 生成文本嵌入
- 使用 SentenceTransformer 模型(如
'all-MiniLM-L6-v2')为每个段落生成向量表示。 - 这些向量能捕获文本的语义信息,相似语义的文本在向量空间中的距离较近。
3.4 构建 FAISS 向量数据库
- 将生成的嵌入转换为 numpy 数组,构建基于 L2 距离的 FAISS 索引。
- 将索引保存为二进制文件,同时保存映射信息到 JSON 文件,便于后续查询时还原原始文本。
import json
import numpy as np
import faiss
from sentence_transformers import SentenceTransformer

def load_processed_data(file_path):
    """
    读取预处理后的 JSON 数据,将所有文章段落抽取成一个列表,同时构建一个映射列表。
    映射列表记录了每个段落所属的文章ID、标题、段落索引和文本内容。
    """
    with open(file_path, "r", encoding="utf-8") as f:
        data = json.load(f)

    texts = []      # 存放所有段落文本
    mapping = []    # 存放每个段落对应的元数据
    for post in data:
        post_id = post.get("id")
        title = post.get("title", "")
        paragraphs = post.get("paragraphs", [])
        for idx, para in enumerate(paragraphs):
            texts.append(para)
            mapping.append({
                "post_id": post_id,
                "title": title,
                "paragraph_index": idx,
                "text": para
            })
    return texts, mapping

def generate_embeddings(texts, model_name='all-MiniLM-L6-v2'):
    """
    加载 SentenceTransformer 模型,并为每个文本段落生成向量嵌入。
    返回的 embeddings 是一个列表,每个元素是一个浮点数数组(向量)。
    """
    model = SentenceTransformer(model_name)
    embeddings = model.encode(texts, show_progress_bar=True)
    return embeddings

def build_faiss_index(embeddings):
    """
    利用 FAISS 构建向量数据库(索引)。
    这里我们使用 L2 距离作为度量标准。
    返回构建好的 FAISS 索引。
    """
    # 将嵌入转换为 numpy 数组,并保证数据类型为 float32
    embeddings_np = np.array(embeddings).astype('float32')
    dimension = embeddings_np.shape[1]
    # 创建基于 L2 距离的索引
    index = faiss.IndexFlatL2(dimension)
    index.add(embeddings_np)
    return index

def save_index_and_mapping(index, mapping, index_file="faiss_index.index", mapping_file="mapping.json"):
    """
    将 FAISS 索引保存到磁盘,同时保存映射列表为 JSON 文件。
    """
    faiss.write_index(index, index_file)
    with open(mapping_file, "w", encoding="utf-8") as f:
        json.dump(mapping, f, ensure_ascii=False, indent=2)
    print(f"索引已保存到 {index_file}")
    print(f"映射信息已保存到 {mapping_file}")

if __name__ == "__main__":
    # 假设预处理后的文件名为 processed_posts.json
    processed_file = "processed_posts_with_img.json"

    # 1. 加载数据,得到所有文本段落和对应映射信息
    texts, mapping = load_processed_data(processed_file)
    print(f"共加载 {len(texts)} 个文本段落。")

    # 2. 生成文本嵌入
    embeddings = generate_embeddings(texts)
    print("文本嵌入生成完毕。")

    # 3. 构建 FAISS 索引
    index = build_faiss_index(embeddings)
    print("FAISS 向量数据库构建完成,向量总数:", index.ntotal)

    # 4. 保存索引和映射信息
    save_index_and_mapping(index, mapping)

向量概念解释
- 向量:在机器学习中,向量是一串数字,用于表示文本、图像等数据的特征。
- 文本向量:通过预训练的模型将文本转换为固定维度的数字数组,这个数组包含了文本的语义信息。
- 相似度计算:当两个文本的向量距离较近时,表示它们的语义相似。在本实验中,我们利用这一特性从知识库中检索与用户问题最相关的文本段落。
步骤 4:检索增强生成(RAG)与回答生成
目标:结合已构建的向量数据库,当用户提出问题时,先检索最相关的上下文,再通过本地部署的大模型生成回答。
4.1 检索相关上下文
- 使用与预处理时相同的 SentenceTransformer 模型生成用户问题的向量。
- 在 FAISS 索引中搜索与该向量最相似的文本段落,并从映射信息中提取详细数据。
- 将检索到的段落拼接成一个上下文字符串。
4.2 构造 Prompt
- 将检索到的上下文与用户问题组合构成一个 prompt,用于指导大模型生成回答。
4.3 调用本地大模型生成回答
- 通过 HTTP POST 请求调用你本地 Ollama 部署的大模型服务,传入构造好的 prompt。
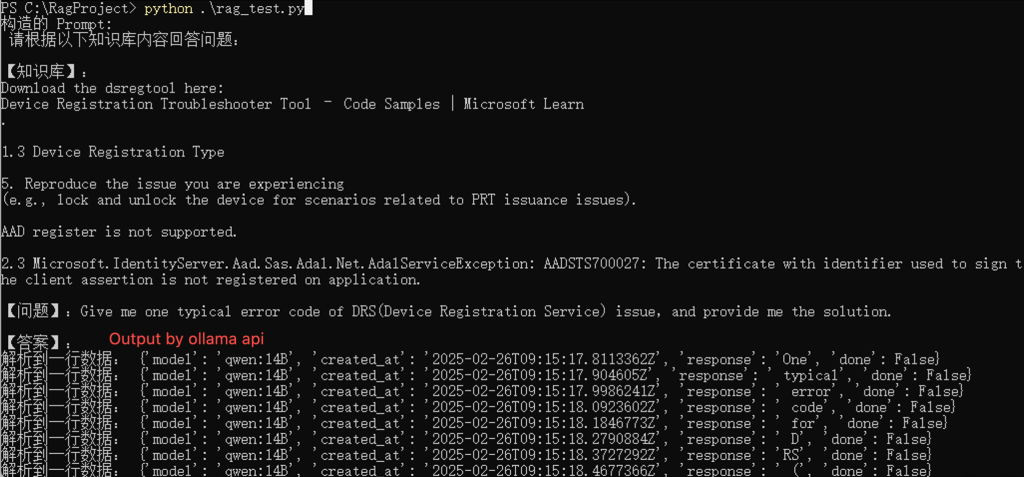
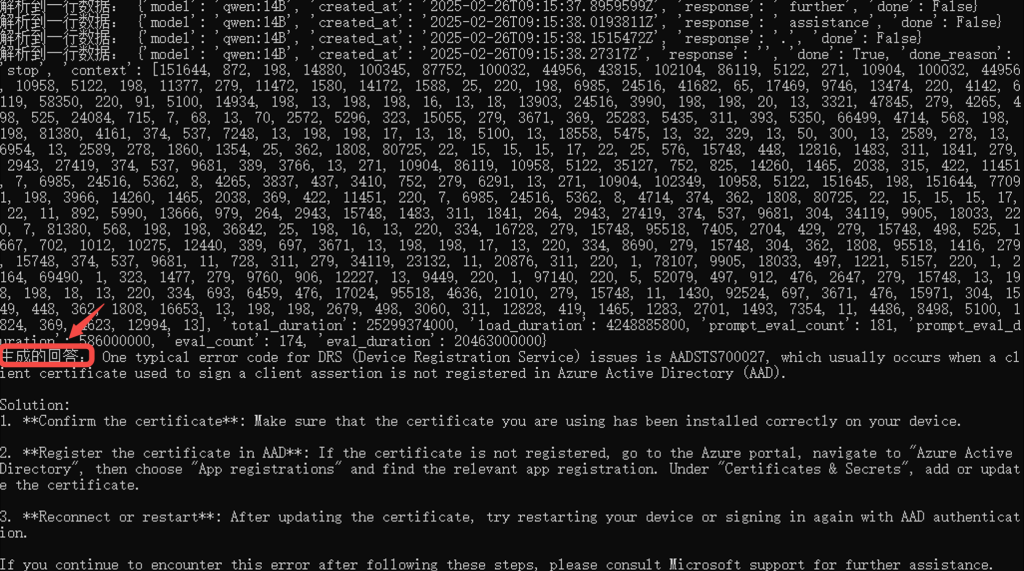
- 由于 Ollama 采用流式返回,代码中会逐行解析返回的 JSON 数据,并将各部分 response 字段拼接成最终回答。
import json
import numpy as np
import faiss
import requests
from sentence_transformers import SentenceTransformer

# --------------------------
# 1. 加载映射和 FAISS 索引
# --------------------------

def load_mapping(mapping_file="mapping.json"):
    with open(mapping_file, "r", encoding="utf-8") as f:
        mapping = json.load(f)
    return mapping

def load_faiss_index(index_file="faiss_index.index"):
    index = faiss.read_index(index_file)
    return index

# --------------------------
# 2. 加载预训练嵌入模型
# --------------------------

# 确保模型与生成向量时使用的一致
model = SentenceTransformer('all-MiniLM-L6-v2')

# --------------------------
# 3. 定义检索函数:给定查询生成嵌入,从索引中检索相关段落
# --------------------------

def retrieve_relevant_context(query, model, index, mapping, top_k=5):
    # 生成查询的向量嵌入
    query_embedding = model.encode([query])
    query_np = np.array(query_embedding).astype('float32')
    # 在 FAISS 索引中进行搜索
    distances, indices = index.search(query_np, top_k)

    # 从映射信息中获取对应的段落信息
    results = []
    for idx in indices[0]:
        if idx < len(mapping):
            results.append(mapping[idx])
    # 将检索到的段落文本合并成上下文
    context = "\n\n".join([item['text'] for item in results])
    return context

# --------------------------
# 4. 构造 Prompt
# --------------------------

def construct_prompt(query, context):
    prompt = (
        f"请根据以下知识库内容回答问题:\n\n"
        f"【知识库】:\n{context}\n\n"
        f"【问题】:{query}\n\n"
        f"【答案】:"
    )
    return prompt

# --------------------------
# 5. 调用本地大模型(Ollama)生成回答
# --------------------------

# 此处示例假设你有一个 Ollama API 服务在本地运行,
# 你需要根据实际情况调整 URL、模型名称和其他参数。

def call_ollama(prompt):
    import json
    import requests

    url = "http://localhost:11434/api/generate"  # 请根据实际情况调整地址
    headers = {"Content-Type": "application/json"}
    payload = {
        "prompt": prompt,
        "model": "qwen:14B",  # 替换为你实际使用的模型名称
        "max_tokens": 3000
    }
    response = requests.post(url, headers=headers, json=payload, stream=True)

    result_text = ""
    # 逐行读取响应
    for line in response.iter_lines():
        if line:
            try:
                data = json.loads(line.decode("utf-8"))
                print("解析到一行数据:", data)  # 调试输出
                if "response" in data:
                    result_text += data["response"]
            except Exception as e:
                print("JSON解析错误,行内容:", line)
                print(e)
    return result_text.strip()

# --------------------------
# 6. 整合整个流程:根据用户查询生成答案
# --------------------------

def generate_answer(query, model, index, mapping, top_k=5):
    # 1. 检索知识库中相关的上下文
    context = retrieve_relevant_context(query, model, index, mapping, top_k)
    # 2. 构造完整的提示词
    prompt = construct_prompt(query, context)
    print("构造的 Prompt:\n", prompt)
    # 3. 调用本地大模型生成回答
    answer = call_ollama(prompt)
    return answer

# --------------------------
# 7. 示例:使用整个流程
# --------------------------

if __name__ == "__main__":
    # 加载映射和 FAISS 索引
    mapping = load_mapping("mapping.json")
    index = load_faiss_index("faiss_index.index")

    # 示例用户提问
    query = "Give me one typical error code of DRS(Device Registration Service) issue,and provide me the solution."

    # 生成回答
    answer = generate_answer(query, model, index, mapping, top_k=5)
    print("生成的回答:", answer)
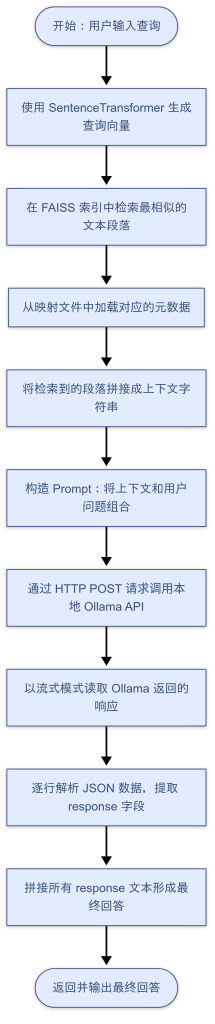
流程图示意
下面是一张流程图,展示了整个检索与回答生成的流程:
总结
通过以上步骤,我们实现了一个完整的流程:
- 数据采集:利用 WordPress REST API 获取文章数据;
- 数据预处理:清洗 HTML、分段处理,并保留图片链接信息;
- 文本嵌入:利用 SentenceTransformer 将文本转换为向量,并构建 FAISS 索引;
- RAG 与回答生成:检索与用户查询最相关的知识库内容,并利用本地大模型生成回答。
整个系统实现了检索增强生成(RAG)的架构,既能利用已有知识库回答问题,又可以通过大模型生成更加智能的回答。