Configuring a CRL Distribution Point for a Certificate Authority via IIS
Overview
Certificate revocation list (CRL) is a part of the X.509 security standard of the International Telecommunication Union (ITU). It’s a way for CAs (or CRL issuers) to make it known that one or more of their digital certificates is no longer trustworthy for one reason or another.
A CA can revoke a certificate of your website for one of several reasons:
- Someone compromises (or is suspected of compromising) your certificate’s private key. (This is the most common reason.)
- The CA mis-issues a certificate and issues a new one to replace it.
- The CA itself is compromised.
- Your organizational details listed in the certificate (for example, your organization’s name) change and the CA needs to reissue the cert to reflect that change.
- A certificate is illegitimate or was fraudulently signed with a stolen key.
Additionally, a CRL Distribution Point (CDP) is a shared location on the network that is used to store the CRL and certificates. The CDP in the certificate must exist to prove that the certificate is valid and has not been revoked.
Generally, if the certificate was issued by an on-premises Enterprise CA, the CDP will use LDAP protocol by default. And the purpose for this certificate would only be communicating internally. Moreover, LDAP is only applicable for on-premises network queries.
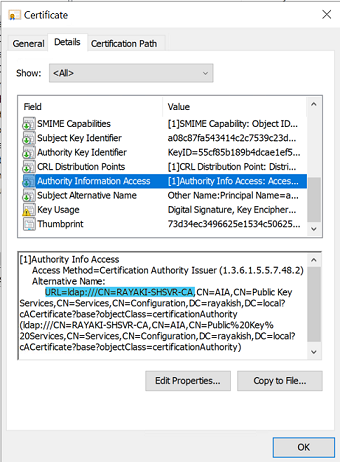
If we want to use this certificate externally, we have to use a http-based CRL distribution point.
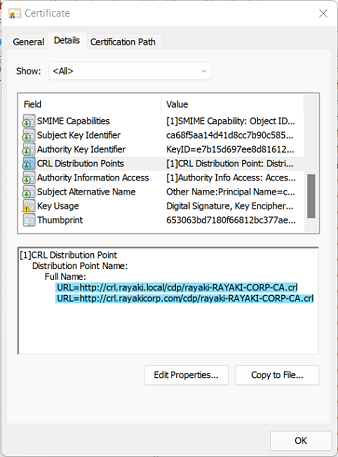
Follow below instruction to update your certificate authority that issues your domain controller certificates to include an http-based CDP.
1. Configure Internet Information Services (IIS) to host CRL distribution point
1.1 Installing the Web Server
1. Sign-in to your server as a local administrator and start Server Manager if it did not start during your sign in.
2. Click the Local Server node in the navigation pane. Click Manage and click Add Roles and Features.
3. In the Add Role and Features Wizard, click Server Selection. Verify the selected server is the local server. Click Server Roles. Select the check box next to Web Server (IIS).

4. Click Next through the remaining options in the wizard, accepting the defaults, and install the Web Server role.
1.2 Configure the Web Server
1. From Windows Administrative Tools, Open Internet Information Services (IIS) Manager.
2. Expand the navigation pane to show Default Web Site. Select and then right-click Default Web site and click Add Virtual Directory…

3. In the Add Virtual Directory dialog box, type cdp in alias. For physical path, type or browse for the physical file location where you will host the certificate revocation list. For this example, the path c:\cdp is used. Click OK.

4. Select CDP under Default Web Site in the navigation pane. Double-click Directory Browsing in the content pane. Click Enable in the details pane.


5. Select CDP under Default Web Site in the navigation pane. Double-click Configuration Editor. 

6. In the Section list, navigate to system.webServer/security/requestFiltering.

In the list of named value-pairs in the content pane, configure allowDoubleEscaping to True. Click Apply in the actions pane.

7. Close Internet Information Services (IIS) Manager.
1.3 Create a DNS resource record for the CRL distribution point URL
1. On your DNS server or from an administrative workstation, open DNS Manager from Administrative Tools.
2. Expand Forward Lookup Zones to show the DNS zone for your domain. Right-click your domain name in the navigation pane and click New Host (A or AAAA)…
3. In the New Host dialog box, type crl in Name. Type the IP address of the web server you configured in IP Address. Click Add Host. Click OK to close the DNS dialog box. Click Done.

4. Close the DNS Manager.
2. Prepare a file share to host the certificate revocation list
The following procedures configure NTFS and share permissions on the web server to allow the certificate authority to automatically publish the certificate revocation list.
2.1 Configure the CDP file share
1. On the web server, open Windows Explorer and navigate to the cdp folder you created in step 1.2 of Configure the Web Server.
2. Right-click the cdp folder and click Properties. Click the Sharing tab. Click Advanced Sharing.
3. Select Share this folder. Type cdp$ in Share name. Click Permissions.

4. In the Permissions for cdp$ dialog box, click Add.
5. In the Select Users, Computers, Service Accounts, or Groups dialog box, click Object Types. In the Object Types dialog box, select Computers, and then click OK.

6. In the Select Users, Computers, Service Accounts, or Groups dialog box, in Enter the object names to select, type the name of the server running the certificate authority issuing the certificate revocation list, and then click Check Names. Click OK.

7. In the Permissions for cdp$ dialog box, select the certificate authority from the Group or user names list. In the Permissions for section, select Allow for Full control. Click OK.

8. In the Advanced Sharing dialog box, click OK.
2.2 Disable Caching
1. On the web server, open Windows Explorer and navigate to the cdp folder you created in step 1.2 of Configure the Web Server.
2. Right-click the cdp folder and click Properties. Click the Sharing tab. Click Advanced Sharing.
3. Click Caching. Select No files or programs from the shared folder are available offline.

4. Click OK.
2.3 Configure NTFS permission for the CDP folder
1. On the web server, open Windows Explorer and navigate to the cdp folder you created in step 1.2 of Configure the Web Server.
2. Right-click the cdp folder and click Properties. Click the Security tab.
3. On the Security tab, click Edit.
4. In the Permissions for cdp dialog box, click Add.
5. In the Select Users, Computers, Service Accounts, or Groups dialog box, click Object Types. In the Object Types dialog box, select Computers. Click OK.

6. In the Select Users, Computers, Service Accounts, or Groups dialog box, in Enter the object names to select, type the name of the certificate authority, and then click Check Names. Click OK.

7. In the Permissions for cdp dialog box, select the name of the certificate authority from the Group or user names list. In the Permissions for section, select Allow for Full control. Click OK.

8. Click Close in the cdp Properties dialog box.
3. Make the CDP IIS Website Accessible to the Public
If you have Azure Premium license, you can simply use Azure AD Application Proxy to publish this CDP website. Please refer to my next post for the step-by-step instructions:
Publish your CDP via Azure AD Application Proxy
4. Configure the new CRL distribution point and Publishing location in the issuing certificate authority
The web server is ready to host the CRL distribution point. Now, configure the issuing certificate authority to publish the CRL at the new location and to include the new CRL distribution point
4.1 Configure the CRL Distribution Point
1. On the issuing certificate authority, sign-in as a local administrator. Start the Certificate Authority console from Administrative Tools.
2. In the navigation pane, right-click the name of the certificate authority and click Properties
3. Click Extensions. On the Extensions tab, select CRL Distribution Point (CDP) from the Select extension list.
4. On the Extensions tab, click Add. Type the following and do not forget the trailing forward slash.
http://<serverurl>/cdp/
e.g. http://crl.contoso.com/cdp/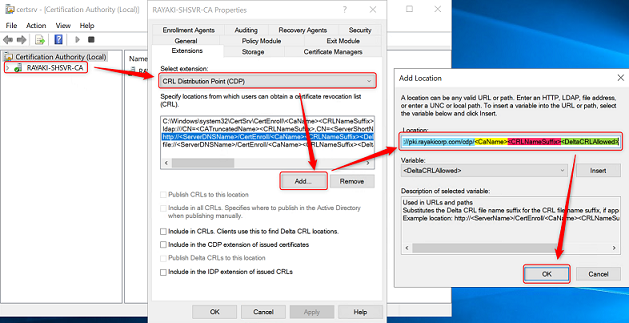
5. Select <CaName> from the Variable list and click Insert. Select <CRLNameSuffix> from the Variable list and click Insert. Select <DeltaCRLAllowed> from the Variable list and click Insert.
6. Type .crl at the end of the text in Location. Click OK.
7. Select the CDP you just created.
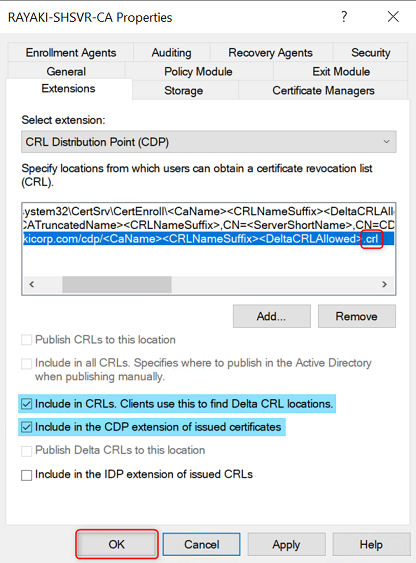
8. Select Include in CRLs. Clients use this to find Delta CRL locations.
9. Select Include in the CDP extension of issued certificates.
10. Click Apply save your selections. Click No when ask to restart the service.
4.2 Configure the CRL publishing location
1. On the issuing certificate authority, sign-in as a local administrator. Start the Certificate Authority console from Administrative Tools.
2. In the navigation pane, right-click the name of the certificate authority and click Properties
3. Click Extensions. On the Extensions tab, select CRL Distribution Point (CDP) from the Select extension list.
4. On the Extensions tab, click Add. Type the computer and share name you create for your CRL distribution point, and do not forget the trailing forward slash.
\\host\cdp$\
e.g. \\RAYAKI-SHSVR-DC\cdp$\
5. Select <CaName> from the Variable list and click Insert. Select <CRLNameSuffix> from the Variable list and click Insert. Select <DeltaCRLAllowed> from the Variable list and click Insert.
6. Type .crl at the end of the text in Location. Click OK.
7. Select the CDP you just created.
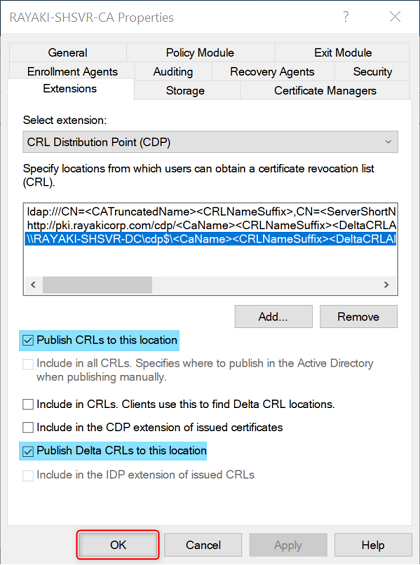
8. Select Publish CRLs to this location.
9. Select Publish Delta CRLs to this location.
10. Click Apply save your selections. Click Yes when ask to restart the service. Click OK to close the properties dialog box.
5. Publish a new CRL
1. On the issuing certificate authority, sign-in as a local administrator. Start the Certificate Authority console from Administrative Tools.
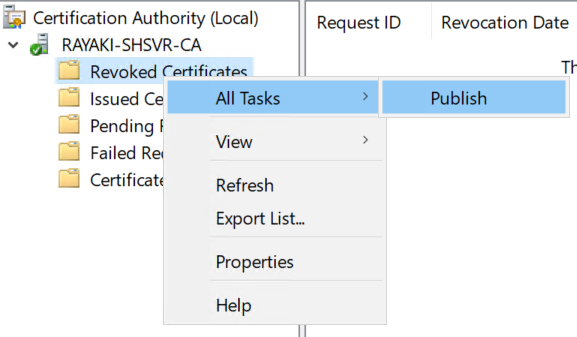
2. In the navigation pane, right-click Revoked Certificates, hover over All Tasks, and click Publish.
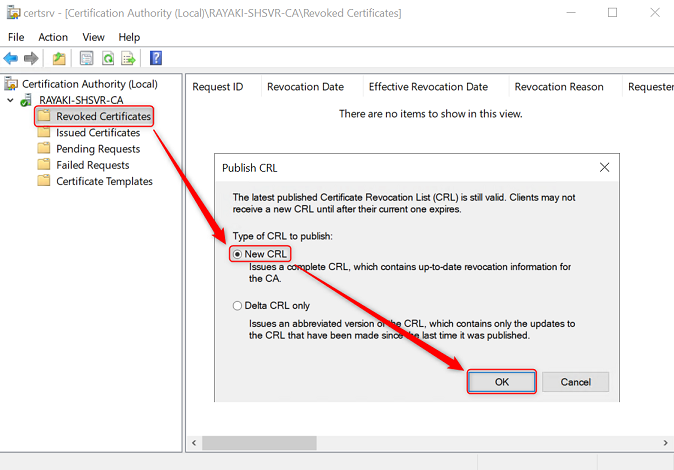
3. In the Publish CRL dialog box, select New CRL and click OK.
6. Validating CDP Publishing
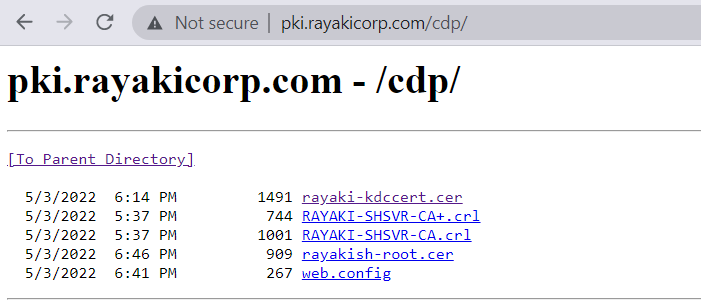
Open the web browser. And input CRL URL that configured before. Two files created from publishing your new CRL will be shown:
7. Validating CDP in the new certificate
