FRP – Part 1: Introduction and Server-Side Setup
In this two-part series, we’ll explore how to use FRP (Fast Reverse Proxy) to securely and efficiently expose local services behind a NAT or firewall to the public internet. In this first part, we’ll focus on what FRP is and how to set up the FRP server (frps) on a machine with a public IP. In Part 2, we’ll cover the client side configuration and how to connect your local services to the server for external access.
What Is FRP?
FRP is an open-source, high-performance reverse proxy solution. It’s frequently used to publish “internal resources” or local services to the internet, bypassing NAT or firewall restrictions. Essentially, if you have a web application, API, or any TCP/UDP service running in a private network, FRP can tunnel that service through a server in the public cloud, enabling external access without complex network changes.
Key Advantages of FRP
- Simple Deployment: You install frps on a public server and frpc on your local machine.
- Versatility: Supports various protocols (HTTP, HTTPS, TCP, UDP, etc.).
- Security: Token-based authentication, TLS options, and more.
- Performance: Lightweight and capable of high throughput.
- Cross-Platform: Runs on Linux, Windows, macOS, ARM, and more.
FRP Architecture at a Glance
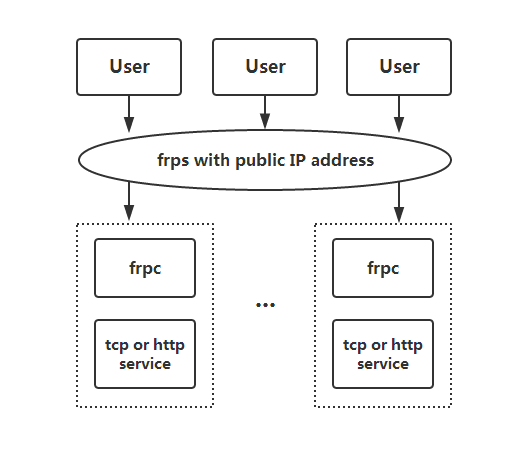
FRP consists of two main components:
- FRP Server (frps): Deployed on a publicly reachable host (has a public IP, or at least a forwarded port). It waits for inbound connections from both the external internet and the FRP clients.
- FRP Client (frpc): Runs on your internal or local machine. It “dials out” to the FRP server, maintaining a secure tunnel. External requests to the server get forwarded back to the local service through this tunnel.
This architecture lets you easily expose local resources without requiring direct inbound connections to your internal network.
Setting Up the FRP Server (frps)
1. Choose a Public Host
You’ll need a public-facing machine—this could be a VPS or cloud server (AWS, DigitalOcean, Azure, etc.) with a public IP address. We’ll refer to this machine as your FRP server.
2. Download FRP
Head over to the official FRP Releases page and choose the frp_{version}_linux_amd64.tar.gz file (assuming you’re on a 64-bit Linux host). Replace the version accordingly, for example:
wget https://github.com/fatedier/frp/releases/download/v0.61.1/frp_0.61.1_linux_amd64.tar.gz
3. Unpack and Organize
Extract the tarball and rename the folder for convenience:
tar -zxvf frp_0.61.1_linux_amd64.tar.gz
mv frp_0.61.1_linux_amd64 /usr/local/frp
cd /usr/local/frp
Inside, you should see frps, frpc, example config files, and other documentation.
4. Configure frps with TOML
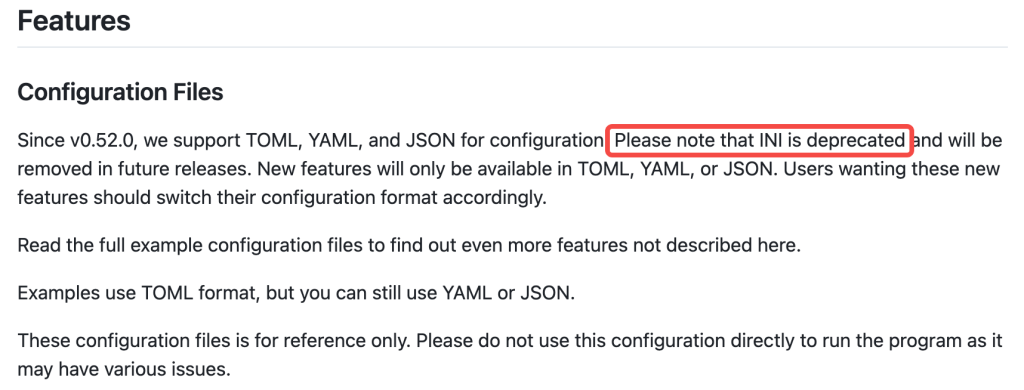
Although FRP historically supported INI, it’s now recommended to use TOML, JSON, or YAML.
Below is an example TOML config named frps.toml:
[common]
bind_port = 7000

dashboard_port = 7500
dashboard_user = "admin"
dashboard_pwd = "admin123"

token = "YOUR_SECRET_TOKEN"
bind_portis the port on which frps listens for connections from FRP clients.dashboard_port,dashboard_user, anddashboard_pwdenable a web UI to monitor FRP activity athttp://SERVER_IP:7500.tokenis a secret key to authenticate incoming connections from frpc. You must use the same token on the client side.

Save this file as /usr/local/frp/frps.toml.
5. Test the Server Manually
Run frps directly to ensure it starts without errors:
./frps -c frps.toml
If successful, you’ll see logs such as:

Press Ctrl + C to stop.
Running frps as a System Service
To ensure frps automatically restarts on reboot, we’ll use systemd.
1. Create a Service File
sudo nano /etc/systemd/system/frps.service
Paste in the following
[Unit]
Description=FRP Server (frps) Service
After=network.target

[Service]
Type=simple
ExecStart=/usr/local/frp/frps -c /usr/local/frp/frps.toml
Restart=on-failure

[Install]
WantedBy=multi-user.target
2. Enable and Start
sudo systemctl daemon-reload
sudo systemctl enable frps
sudo systemctl start frps
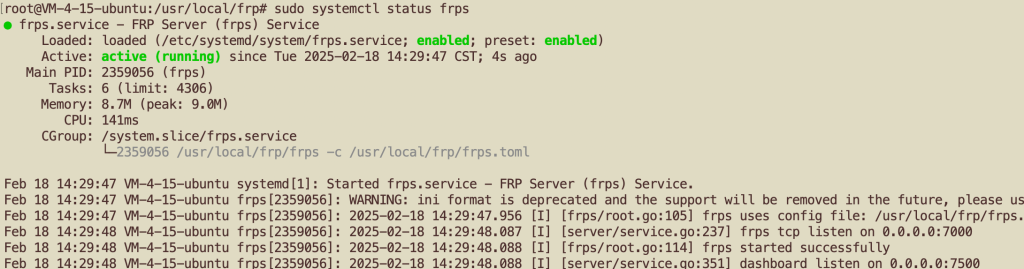
3. Verify
sudo systemctl status frps
If it shows active (running), frps is now running in the background.
Firewall & Security Group Rules
If you’re using a cloud provider, ensure TCP:7000 and TCP:7500 (for the dashboard) are allowed in your security group. Also, if you’re running a local firewall (e.g., ufw, firewalld), open those ports as well:
Ubuntu/Debian (ufw):
sudo ufw allow 7000/tcp
sudo ufw allow 7500/tcp
CentOS/RHEL (firewalld):
sudo firewall-cmd --add-port=7000/tcp --permanent
sudo firewall-cmd --add-port=7500/tcp --permanent
sudo firewall-cmd --reload
Monitoring the FRP Dashboard
With dashboard_port configured, you can visit:
http://SERVER_PUBLIC_IP:7500
Login using:
- Username:
admin - Password:
admin123
(or whatever you set infrps.toml). You’ll see details like connected clients, proxies, and traffic stats.

Performance Considerations
One common question is whether FRP’s speed depends on the server’s bandwidth. In short, yes. When you use FRP to expose a local service:
- Traffic flows from your local machine to the FRP server, and then
- From the FRP server to the end user (or in reverse).
Because all data is relayed through the FRP server, the throughput is directly influenced by the server’s network capacity (and of course, your local network as well). If your server is on a slow connection or limited bandwidth, the maximum throughput will be restricted even if you have fast internet at home. Similarly, if your local upload bandwidth is small, that also becomes a bottleneck.
Key Factors
- Server Bandwidth: A low or congested network on your VPS/cloud server will limit overall speeds.
- Server Performance: CPU/memory constraints can become a bottleneck under heavy loads.
- Local Network: If your home or office upload bandwidth is small, your traffic can’t exceed that limit.
- Routing & Latency: Geographical distance and ISP routing can affect transfer speeds and latency.
In other words, the slowest or most congested link between your local machine and the FRP server (and onward to the requesting client) will dictate the maximum speed.
What’s Next?
You’ve successfully installed the FRP server (frps) on your public host. In Part 2, we’ll set up the FRP client (frpc) on your local machine. By using the same token and specifying the server_addr/server_port you just configured, you’ll be able to tunnel your private services through the FRP server and make them accessible from the internet.