FRP – Part 2: Client-Side Setup (Windows)
In Part 1 of this series, we explained what FRP is and how to set up the FRP server (frps) on a public-facing machine. Now it’s time to configure the FRP client (frpc) on a Windows computer so you can tunnel local services through the FRP server and make them accessible from the internet.
1. Prerequisites
- You have Windows on your local machine (e.g., Windows 10 or 11).
- You have a local service you want to expose—for example, a web app running on port 8080.
- The server’s firewall or security group allows inbound connections on the FRP server’s listening port (e.g., 7000).
2. Download and Extract frpc for Windows
- Visit the FRP Releases page
Go to the official FRP GitHub Releases. - Choose the Windows build
For most modern Windows systems, select something likefrp_0.61.1_windows_amd64.zip(or the latest version). - Extract the ZIP
Unzip the file into a convenient folder, e.g.:C:\frp\Inside this directory, you should see:frpc.exe- (Optionally)
frps.exe - Example config files like
frpc_full.ini,frpc_full.toml, etc.
3. Create a Client Configuration (TOML Example)
As I metioned in previous post, while INI format is still supported (with a deprecation warning), it’s recommended to use TOML, JSON, or YAML. Here’s a TOML example named frpc.toml.
3.1 Basic Configuration
Open Notepad (or your favorite editor) and create C:\frp\frpc.toml:
[common]
server_addr = "YOUR_SERVER_PUBLIC_IP_OR_DOMAIN"
server_port = 7000
token = "YOUR_SECRET_TOKEN"
- server_addr: IP or domain of the server where frps is running (e.g.,
1.2.3.4ormyserver.com). - server_port: Match the
bind_portfrom yourfrps.toml(often 7000). - token: Must match the token set in the server config.
3.2 Defining Proxies
Below [common], you can define one or more “proxies” to tunnel specific services. Let’s look at two approaches:
(A) HTTP/HTTPS Proxy (with Domain)
If you have a domain (example.com) pointing to your FRP server:
[proxies.my_http]
type = "http"
local_ip = "127.0.0.1"
local_port = 8080
custom_domains = ["example.com"]
- type = “http”: Tunneling over HTTP (or HTTPS if you configure TLS on the server side).
- local_ip and local_port: The service on your Windows machine (e.g., a web server on port
8080). - custom_domains: FRP will direct traffic for
example.com(A record points to your server IP) to this local service.
(B) TCP Proxy (Direct Port Mapping)
If you do not have a domain or you just want to map a port:
[proxies.my_tcp]
type = "tcp"
local_ip = "127.0.0.1"
local_port = 8080
remote_port = 9000
- type = “tcp”: Expose your service over a raw TCP tunnel.
- remote_port: The port on the FRP server that will map to your local
8080.
When someone visits YOUR_SERVER_IP:9000, FRP will forward the connection to 127.0.0.1:8080 on your Windows machine.
Note: You can create multiple
[proxies.*]sections to expose multiple services.
(C) RDP Proxy
If you wish to access your Windows machine’s Remote Desktop (RDP) service through FRP, you can set up a TCP proxy that maps the local RDP port (default 3389) to a remote port on your FRP server. For example:
[proxies.my_rdp]
type = "tcp"
local_ip = "127.0.0.1"
local_port = 3389
remote_port = 6000
- local_port (3389): The default port for Windows RDP.
- remote_port (6000): An arbitrary free port on the FRP server. You can choose a different port if needed.
Once configured, connecting to the FRP server at YOUR_SERVER_IP:6000 will forward you to your Windows machine’s RDP session.
Note: Ensure that your Windows machine’s RDP is enabled and that the Windows Firewall permits inbound RDP connections. Make sure that your FRP server remote_port is enabled as well.
4. Run frpc on Windows
Open Command Prompt or PowerShell, navigate to C:\frp\, and run:
.\frpc.exe -c .\frpc.toml
If everything is correct, you’ll see logs like:
2025/02/17 09:00:00 [I] [service.go:XXX] login to server success, get run id [abcd1234] ...
2025/02/17 09:00:00 [I] [proxy_manager.go:XXX] proxy added: [my_http]
This indicates that frpc successfully connected to the server and is now forwarding traffic.
5. Verifying the Tunnel
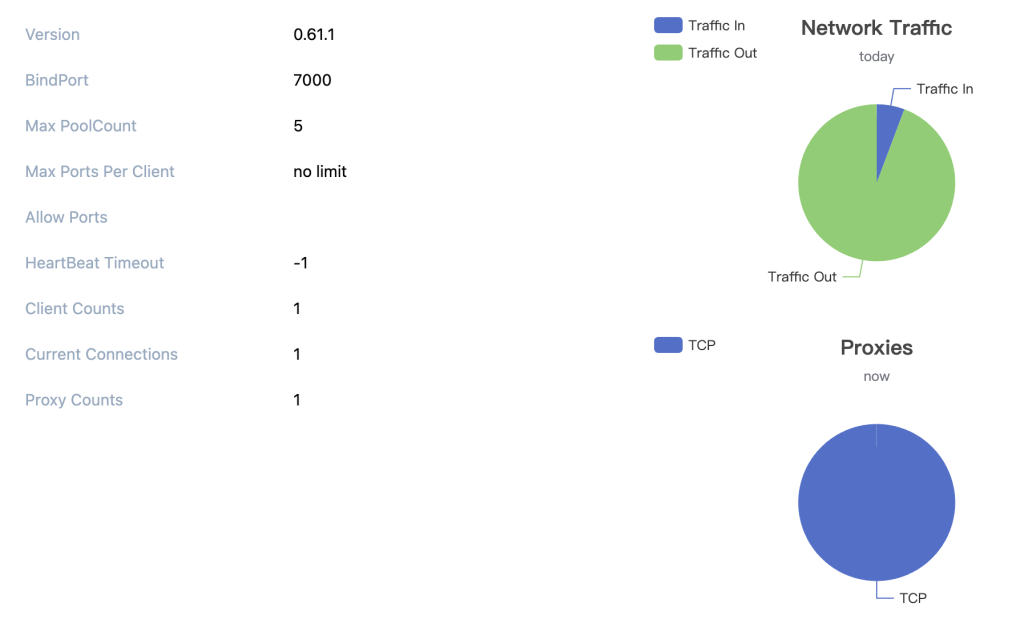
5.1 Dashboard (On the Server)
If you enabled a dashboard on the server (e.g., port 7500 in your frps.toml), open:
http://YOUR_SERVER_IP:7500
Log in with the username/password you configured (admin/admin123 by default). You should see the my_http or my_tcp proxy listed under “Proxies.”
5.2 Accessing Your Service
- If you used HTTP + domain: Visit
http://example.com(assuming your DNS points to the server IP). - If you used TCP + remote_port: Go to
http://YOUR_SERVER_IP:9000(ortelnet YOUR_SERVER_IP 9000for raw TCP). - Confirm you can reach your local service (e.g., a web page, API, or database port).
If everything is set up correctly, your Windows machine’s service is now publicly accessible through the FRP server.
6. Common Pitfalls
- Token Mismatch
- If your server uses a
token, ensure the same token is set infrpc.toml. Otherwise, you’ll see a “bad authentication” error.
- If your server uses a
- Local Port Unavailable
- Ensure the service is actually running on the port you specified (
8080in these examples). If your app is on a different port, adjust accordingly.
- Ensure the service is actually running on the port you specified (
- Firewall or NAT on the Client Side
- Typically Windows outbound traffic is allowed, but double-check that your service and outbound port aren’t blocked.
- Missing or Incorrect DNS
- If you’re using a custom domain, be sure the domain’s A record points to the FRP server’s IP.
- Server-Side Firewall
- If the server’s firewall or security group isn’t open on the FRP port, you won’t be able to connect from Windows.
7. Performance Considerations
Remember that traffic flows through your FRP server. The overall speed is influenced by:
- Your local (Windows) upload/download bandwidth
- The FRP server’s network capacity
- Geographical distance & routing (especially if the server is far away)
In other words, whichever segment is the bottleneck (local network or server bandwidth) will set the effective limit.
8. Persisting frpc as a Service (Optional)
If you want frpc to auto-start when you log in or reboot your Windows PC, you have a few options:
- Scheduled Task
- Use Windows Task Scheduler to run
frpc.exe -c frpc.tomlat login or system startup.
- Use Windows Task Scheduler to run
- Startup Folder
- Place a shortcut to
frpc.exein the Windows “Startup” folder.
- Place a shortcut to
- Run as a Service (3rd-Party Tools)
- Tools like NSSM (Non-Sucking Service Manager) can help you run
frpc.exeas a Windows service.
- Tools like NSSM (Non-Sucking Service Manager) can help you run
Conclusion
You’ve now completed your FRP setup:
Part 1 covered the server side: installing frps on a public IP host, configuring ports, setting up security groups, and launching via systemd.
This Part 2 introduced the Windows client: installing frpc, creating a TOML config, and mapping local ports or domains to the server.
With both sides configured, your internal Windows services are now accessible online via FRP—without needing to expose your local network directly. Enjoy your newly tunneled setup!